> ## Documentation Index
> Fetch the complete documentation index at: https://stackone-hub-mintlify-faq-auth-1778741451.mintlify.site/llms.txt
> Use this file to discover all available pages before exploring further.

# SAP SuccessFactors Application Custom Fields

> To create and view application custom fields in SAP SuccessFactors, follow these steps

<Warning>
  This guidance assumes that you have admin privileges for your SAP SuccessFactors account.
</Warning>

## Configure Application Custom Fields

<Steps>
  <Step title="Search for Manage Templates">
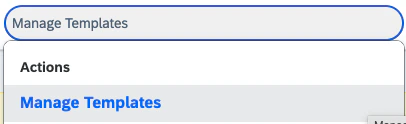
    Type *Manage Templates* into the search bar and select it from the results
    <Frame>
      <img className="rounded-md" style={{ margin: '0 auto', border: '1px solid #efefef' }} alt="Search Manage Templates" src="https://mintcdn.com/stackone-hub-mintlify-faq-auth-1778741451/K8GBYq-l4ZEZd4Dm/images/sapsuccessfactors/application-custom-field/sapsf_application_cf_manage_template_search_1.png?fit=max&auto=format&n=K8GBYq-l4ZEZd4Dm&q=85&s=bd9b71a266a1fbe3a0530d536e03cddf" width="406" height="124" data-path="images/sapsuccessfactors/application-custom-field/sapsf_application_cf_manage_template_search_1.png" />
    </Frame>
  </Step>

  <Step title="Select Job Application template">
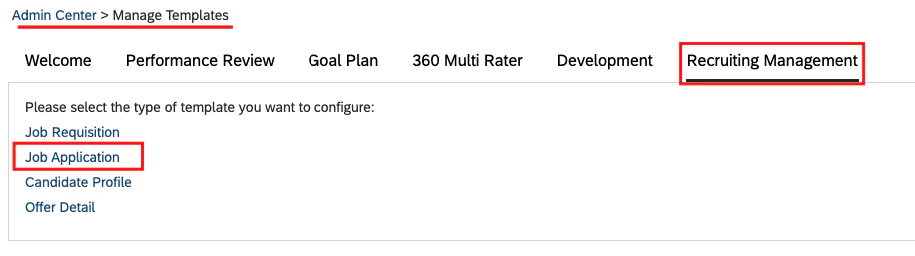
    Go to the *Recruiting Management* tab, select *Job Application*, and choose the default active template to which you want to add a custom fields
    <Frame>
      <img className="rounded-md" style={{ margin: '0 auto', border: '1px solid #efefef' }} alt="Search Manage Templates" src="https://mintcdn.com/stackone-hub-mintlify-faq-auth-1778741451/K8GBYq-l4ZEZd4Dm/images/sapsuccessfactors/application-custom-field/sapsf_application_cf_mt_Recrut_manage_job_application_option_2.png?fit=max&auto=format&n=K8GBYq-l4ZEZd4Dm&q=85&s=c1b344f138ce7cfa3d0707f355dabcee" width="915" height="256" data-path="images/sapsuccessfactors/application-custom-field/sapsf_application_cf_mt_Recrut_manage_job_application_option_2.png" />
    </Frame>
  </Step>

  <Step title="Add application custom fields in template">
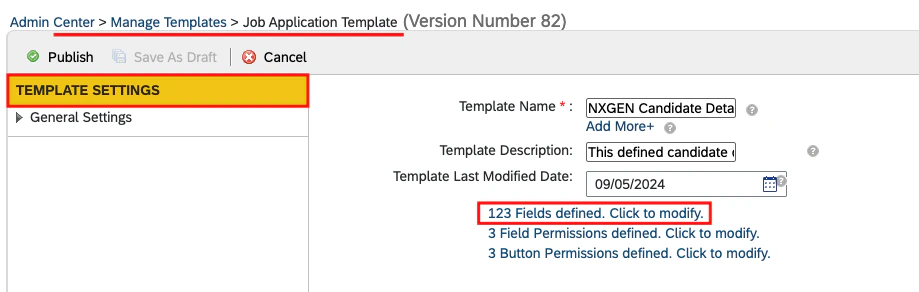
    Click on `Fields defined`

    <Frame>
      <img className="rounded-md" style={{ margin: '0 auto', border: '1px solid #efefef' }} alt="Search Manage Templates" src="https://mintcdn.com/stackone-hub-mintlify-faq-auth-1778741451/K8GBYq-l4ZEZd4Dm/images/sapsuccessfactors/application-custom-field/sapsf_appliation_cf_mt_Temaplate_settingS_Field_defined_3.png?fit=max&auto=format&n=K8GBYq-l4ZEZd4Dm&q=85&s=1d15f4947114a5537b93f1323c4dac14" width="919" height="292" data-path="images/sapsuccessfactors/application-custom-field/sapsf_appliation_cf_mt_Temaplate_settingS_Field_defined_3.png" />
    </Frame>

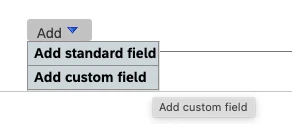
    Click the `Add` button and select `Add Custom Field` to add a new custom field block
    <Frame>
      <img className="rounded-md" style={{ margin: '0 auto', border: '1px solid #efefef' }} alt="Search Manage Templates" src="https://mintcdn.com/stackone-hub-mintlify-faq-auth-1778741451/K8GBYq-l4ZEZd4Dm/images/sapsuccessfactors/application-custom-field/sapsf_aaplication_cf_add_custom_field_button_9.png?fit=max&auto=format&n=K8GBYq-l4ZEZd4Dm&q=85&s=d26887be0e92ddeacd9c088e008d7120" width="292" height="124" data-path="images/sapsuccessfactors/application-custom-field/sapsf_aaplication_cf_add_custom_field_button_9.png" />
    </Frame>

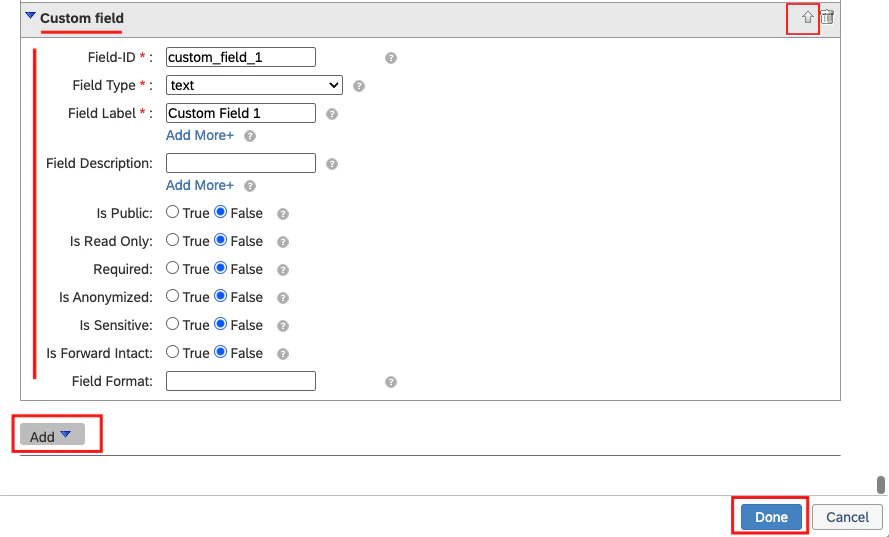
    Enter the following field values:

    * **Field ID:** Enter the ID of the field.
    * **Field Type:** Select the type of field (e.g., text).
    * **Field Label:** Enter a label for the field.
    * **Field Description:** Provide a description for the field.

    <Info>
      You can select other field's values either as shown in the image or according to your preferences.
    </Info>

    <Frame>
      <img className="rounded-md" style={{ margin: '0 auto', border: '1px solid #efefef' }} alt="Search Manage Templates" src="https://mintcdn.com/stackone-hub-mintlify-faq-auth-1778741451/K8GBYq-l4ZEZd4Dm/images/sapsuccessfactors/application-custom-field/sapsf_application_cf_add_custom_field_and_enter_details_and_done_4.png?fit=max&auto=format&n=K8GBYq-l4ZEZd4Dm&q=85&s=55517713c74c2209b4ed04314d5d7803" width="889" height="537" data-path="images/sapsuccessfactors/application-custom-field/sapsf_application_cf_add_custom_field_and_enter_details_and_done_4.png" />
    </Frame>

    Click on `Done` to save your changes.

    <Note>
      You can set the position of the custom fields using the top and bottom arrows.
    </Note>
  </Step>

  <Step title="Add application custom fields permissions">
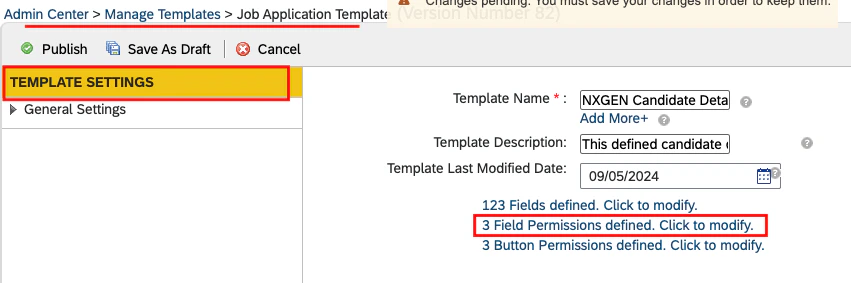
    Click on `Fields Permissions defined`

    <Frame>
      <img className="rounded-md" style={{ margin: '0 auto', border: '1px solid #efefef' }} alt="Search Manage Templates" src="https://mintcdn.com/stackone-hub-mintlify-faq-auth-1778741451/K8GBYq-l4ZEZd4Dm/images/sapsuccessfactors/application-custom-field/sapsf_application_cf_field_permisssion_5.png?fit=max&auto=format&n=K8GBYq-l4ZEZd4Dm&q=85&s=f45520e9a465bb50f032b103099cb597" width="851" height="283" data-path="images/sapsuccessfactors/application-custom-field/sapsf_application_cf_field_permisssion_5.png" />
    </Frame>

    Enter the following field values:

    * **Field Permission Description:** You can enter any description as this field allows free text.
    * **Field Permission Type:** Select `Write Permission`.
    * **Field Permission Role Name:** Choose the role for which you want to make this custom field visible.
    * **Field Reference ID:** Select the custom field ID that you added in the step above.

    <Info>
      You can choose other field's values based on your preferences.
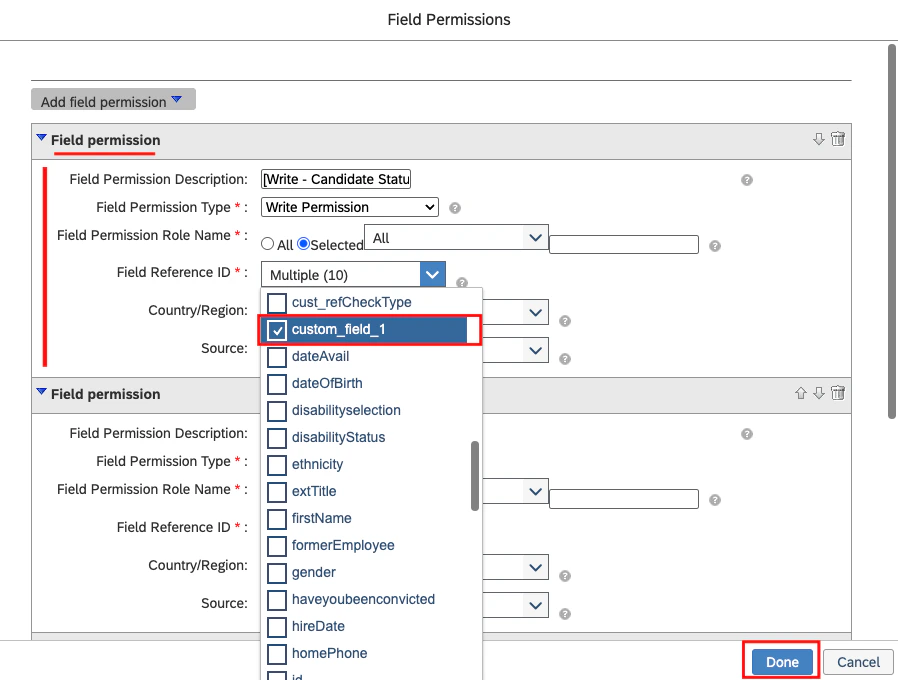
    </Info>

    <Frame>
      <img className="rounded-md" style={{ margin: '0 auto', border: '1px solid #efefef' }} alt="Search Manage Templates" src="https://mintcdn.com/stackone-hub-mintlify-faq-auth-1778741451/K8GBYq-l4ZEZd4Dm/images/sapsuccessfactors/application-custom-field/sapsf_application_cf_add_or_edit_permission_and_save_6.png?fit=max&auto=format&n=K8GBYq-l4ZEZd4Dm&q=85&s=b9a965c4be18c10d88804d7c8d4de00a" width="898" height="680" data-path="images/sapsuccessfactors/application-custom-field/sapsf_application_cf_add_or_edit_permission_and_save_6.png" />
    </Frame>

    Click on `Done` to save your changes.
  </Step>

  <Step title="Ensure that you save all of your changes">
    To save your changes, click on `Save & Draft` and then select `Publish`.

    <Warning>
      Changes will only be published if they do not contain any validation errors.
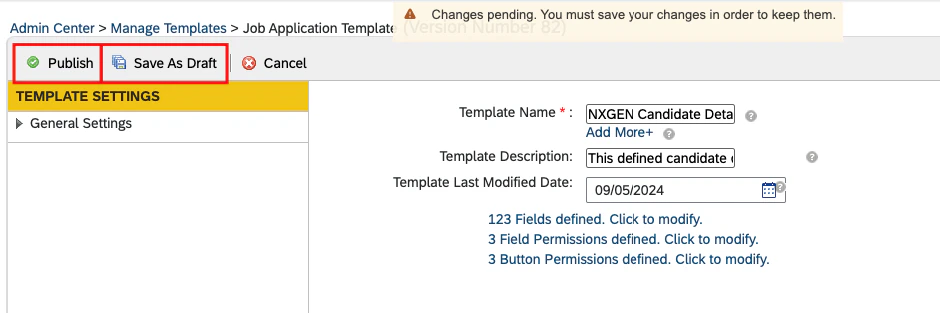
    </Warning>

    <Frame>
      <img className="rounded-md" style={{ margin: '0 auto', border: '1px solid #efefef' }} alt="Search Manage Templates" src="https://mintcdn.com/stackone-hub-mintlify-faq-auth-1778741451/K8GBYq-l4ZEZd4Dm/images/sapsuccessfactors/application-custom-field/sapsf_application_cf_save_as_draft_and_publish_7.png?fit=max&auto=format&n=K8GBYq-l4ZEZd4Dm&q=85&s=6e1dc1f34dd3fb741c45442a77f7d6fd" width="940" height="313" data-path="images/sapsuccessfactors/application-custom-field/sapsf_application_cf_save_as_draft_and_publish_7.png" />
    </Frame>
  </Step>
</Steps>

## Configure Job Requisition Template to Add Custom Fields

<Steps>
  <Step title="Search for Manage Templates">
    Type *Manage Templates* into the search bar and select it from the results

    <Frame>
      <img className="rounded-md" style={{ margin: '0 auto', border: '1px solid #efefef' }} alt="Search Manage Templates" src="https://mintcdn.com/stackone-hub-mintlify-faq-auth-1778741451/K8GBYq-l4ZEZd4Dm/images/sapsuccessfactors/application-custom-field/sapsf_application_cf_manage_template_search_1.png?fit=max&auto=format&n=K8GBYq-l4ZEZd4Dm&q=85&s=bd9b71a266a1fbe3a0530d536e03cddf" width="406" height="124" data-path="images/sapsuccessfactors/application-custom-field/sapsf_application_cf_manage_template_search_1.png" />
    </Frame>
  </Step>

  <Step title="Select Job Requisition template">
    Navigate to *Recruiting Management* tab > *Job Requisition*,
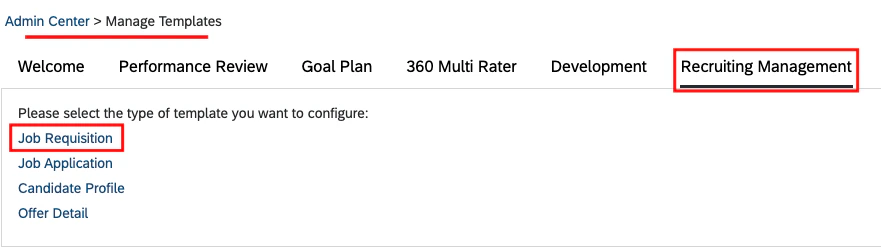
    <Frame>
      <img className="rounded-md" style={{ margin: '0 auto', border: '1px solid #efefef' }} alt="Search Manage Templates" src="https://mintcdn.com/stackone-hub-mintlify-faq-auth-1778741451/K8GBYq-l4ZEZd4Dm/images/sapsuccessfactors/application-custom-field/sapsf_application_cf_in_job_req_to_show_8.png?fit=max&auto=format&n=K8GBYq-l4ZEZd4Dm&q=85&s=cdbae656f4f602b17e18368969d4807a" width="881" height="247" data-path="images/sapsuccessfactors/application-custom-field/sapsf_application_cf_in_job_req_to_show_8.png" />
    </Frame>

    Select the Job Requisition template to display the application custom fields, such as `Standard Job Requisition`
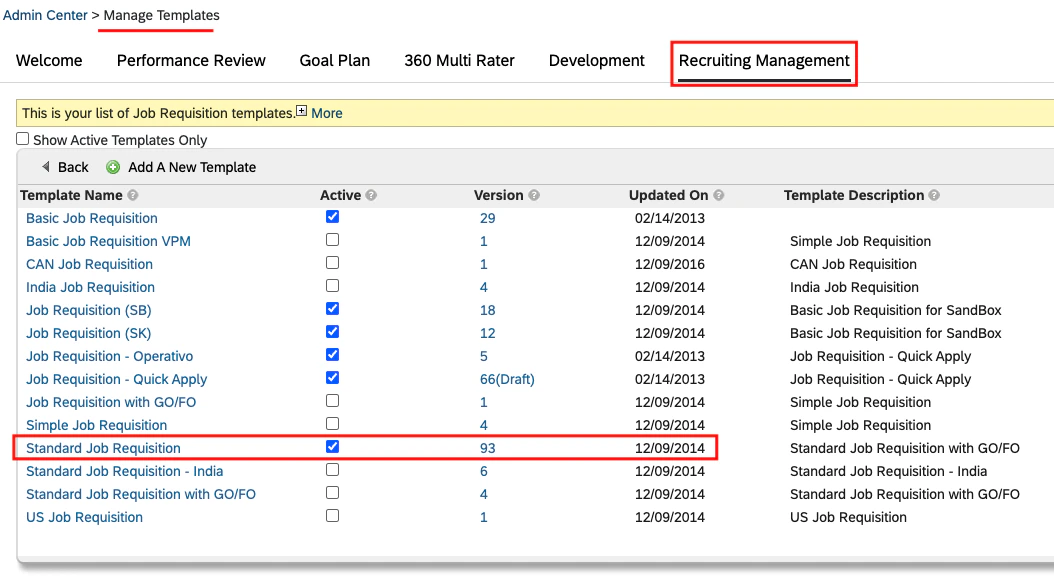
    <Frame>
      <img className="rounded-md" style={{ margin: '0 auto', border: '1px solid #efefef' }} alt="Search Manage Templates" src="https://mintcdn.com/stackone-hub-mintlify-faq-auth-1778741451/K8GBYq-l4ZEZd4Dm/images/sapsuccessfactors/application-custom-field/sapsf_application_cf_mt_jr_standard_9.png?fit=max&auto=format&n=K8GBYq-l4ZEZd4Dm&q=85&s=862b04fe5b88d5b72d6e23e74d118f4e" width="1054" height="577" data-path="images/sapsuccessfactors/application-custom-field/sapsf_application_cf_mt_jr_standard_9.png" />
    </Frame>
  </Step>

  <Step title="Add permissions for application custom fields into the Job Requisition template">
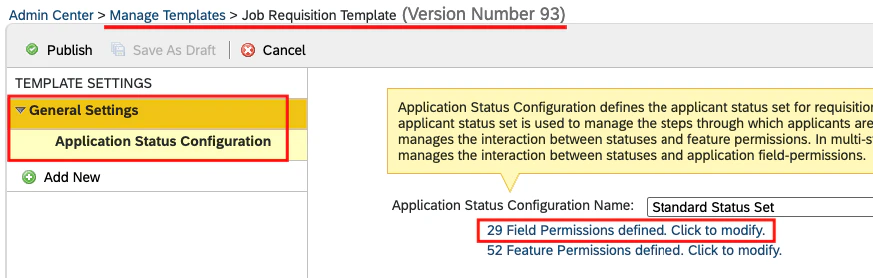
    Click on `General Settings` > `Application Status Configuration` > `Field Permissions defined`
    <Frame>
      <img className="rounded-md" style={{ margin: '0 auto', border: '1px solid #efefef' }} alt="Search Manage Templates" src="https://mintcdn.com/stackone-hub-mintlify-faq-auth-1778741451/K8GBYq-l4ZEZd4Dm/images/sapsuccessfactors/application-custom-field/sapsf_application_cf_mt_jr_standard_field_permission_10.png?fit=max&auto=format&n=K8GBYq-l4ZEZd4Dm&q=85&s=63fc01cd1558ed546979dbf15d2be3bc" width="873" height="278" data-path="images/sapsuccessfactors/application-custom-field/sapsf_application_cf_mt_jr_standard_field_permission_10.png" />
    </Frame>

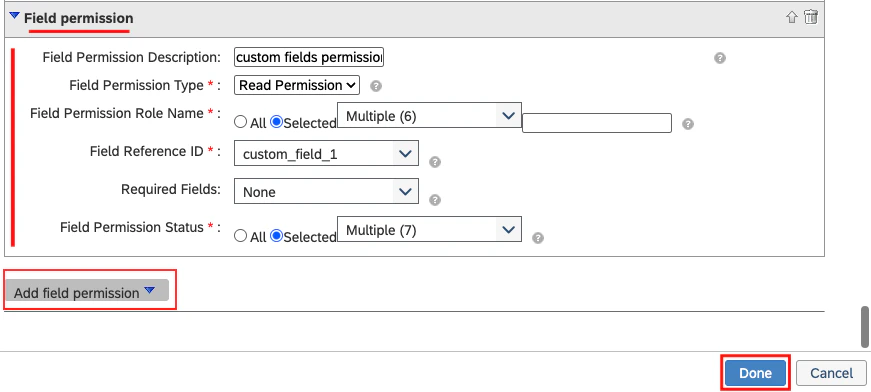
    Click on the `Add` button to add a new field permission block, then Enter the following field values:

    * **Field Permission Description:** You can enter any description as this field allows free text.
    * **Field Permission Type:** Select `Read Permission`.
    * **Field Permission Role Name:** Choose the permission role for which the fields will be displayed.
    * **Field Reference ID:** Select the custom field ID you added in the previous <a href="#configure-application-custom-fields">step 3</a> under "Configure Application Custom Fields" process that needs to be displayed on the UI.
    * **Required Fields:** Choose the fields that you want to make mandatory.
    * **Field Permission Status:** Select the application status indicating when the fields should be displayed.
    <Frame>
      <img className="rounded-md" style={{ margin: '0 auto', border: '1px solid #efefef' }} alt="Search Manage Templates" src="https://mintcdn.com/stackone-hub-mintlify-faq-auth-1778741451/K8GBYq-l4ZEZd4Dm/images/sapsuccessfactors/application-custom-field/sapsf_application_cf_mt_jr_standard_fp_add_for_custom_11.png?fit=max&auto=format&n=K8GBYq-l4ZEZd4Dm&q=85&s=df4bbac8aed7e8da6ab13a607a4d61e5" width="871" height="392" data-path="images/sapsuccessfactors/application-custom-field/sapsf_application_cf_mt_jr_standard_fp_add_for_custom_11.png" />
    </Frame>

    Click on `Done` to save your changes.
  </Step>

  <Step title="Ensure that you save all of your changes">
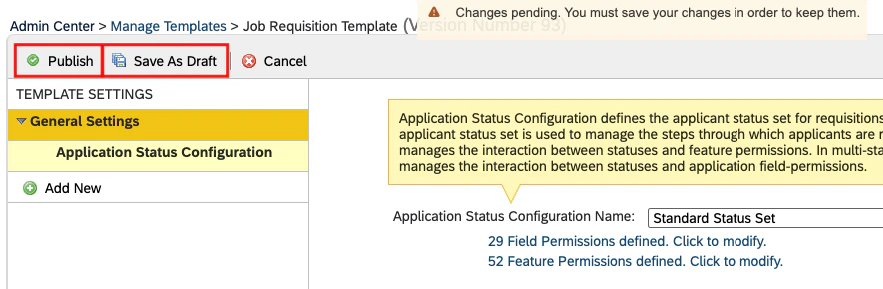
    Click on `Save & Draft`, and then click `Publish` to save your changes.

    <Warning>
      Changes will only be published if they do not contain any validation errors.
    </Warning>

    <Frame>
      <img className="rounded-md" style={{ margin: '0 auto', border: '1px solid #efefef' }} alt="Search Manage Templates" src="https://mintcdn.com/stackone-hub-mintlify-faq-auth-1778741451/K8GBYq-l4ZEZd4Dm/images/sapsuccessfactors/application-custom-field/sapsf_application_cf_save_field_permissions_12.png?fit=max&auto=format&n=K8GBYq-l4ZEZd4Dm&q=85&s=a25c4964e883a025886d11663d426c26" width="883" height="289" data-path="images/sapsuccessfactors/application-custom-field/sapsf_application_cf_save_field_permissions_12.png" />
    </Frame>
  </Step>
</Steps>

## View Application Custom Fields in the Job Application

<Steps>
  <Step title="Go to Job Requisition">
    <Info>
      The custom fields will be displayed for applications associated with job requisition templates for which custom fields are configured.
    </Info>

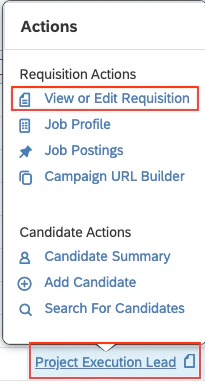
    Navigate to *Job Requisition*, hover over the specific requisition title to open the Actions menu and then select `View or Edit Requisition`.

    <Accordion title="How to check the Job Requisition Template Name">
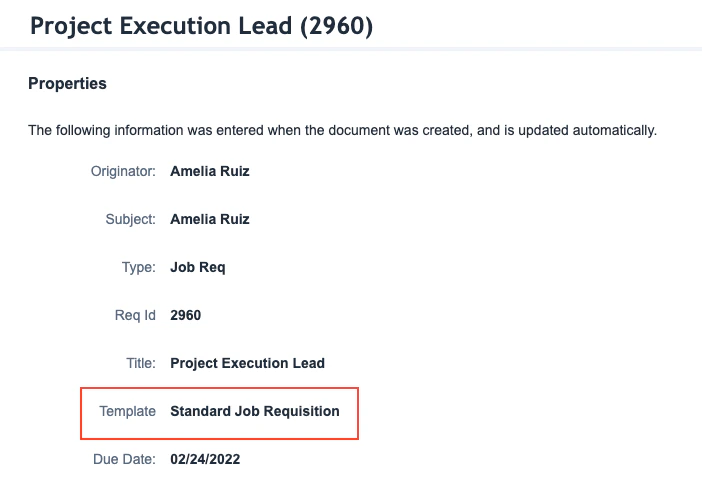
      Go to the *Recruiting* and select any specific job requisition.

      <Frame>
        <img className="rounded-md" style={{ margin: '0 auto', border: '1px solid #efefef' }} alt="Specific Job Requistion" src="https://mintcdn.com/stackone-hub-mintlify-faq-auth-1778741451/K8GBYq-l4ZEZd4Dm/images/sapsuccessfactors/application-custom-field/sap_sf_bc_recruiting_info_26.png?fit=max&auto=format&n=K8GBYq-l4ZEZd4Dm&q=85&s=07767d09564dacd6b3f0091d91d5958d" width="1271" height="122" data-path="images/sapsuccessfactors/application-custom-field/sap_sf_bc_recruiting_info_26.png" />
      </Frame>

      Click on the `i` icon to view the Job Requisition Template.
      <Frame>
        <img className="rounded-md" style={{ margin: '0 auto', border: '1px solid #efefef' }} alt="JR Info" src="https://mintcdn.com/stackone-hub-mintlify-faq-auth-1778741451/K8GBYq-l4ZEZd4Dm/images/sapsuccessfactors/application-custom-field/sap_sf_bc_recruiting_JR_info_27.png?fit=max&auto=format&n=K8GBYq-l4ZEZd4Dm&q=85&s=49569ef8c6fbbccd14a62f6c1a05fb3a" width="702" height="490" data-path="images/sapsuccessfactors/application-custom-field/sap_sf_bc_recruiting_JR_info_27.png" />
      </Frame>
    </Accordion>

    <Frame>
      <img className="rounded-md" style={{ margin: '0 auto', border: '1px solid #efefef' }} alt="Search Manage Templates" src="https://mintcdn.com/stackone-hub-mintlify-faq-auth-1778741451/K8GBYq-l4ZEZd4Dm/images/sapsuccessfactors/application-custom-field/sap_sf_bc_recruiting_JR_hove_actions_32.png?fit=max&auto=format&n=K8GBYq-l4ZEZd4Dm&q=85&s=abc843a17ec2520b07da23eb9792e770" width="205" height="384" data-path="images/sapsuccessfactors/application-custom-field/sap_sf_bc_recruiting_JR_hove_actions_32.png" />
    </Frame>

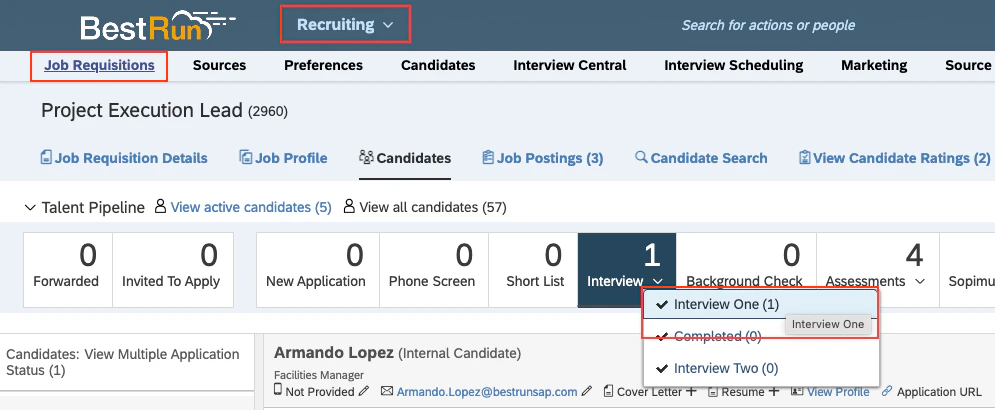
    Access the candidate's job application and update their application status as you have configured in the <a href="#configure-job-requisition-template-to-add-custom-fields">step 3</a> in the "Configure Job Requisition Template to Add Custom Fields" process.
    <Frame>
      <img className="rounded-md" style={{ margin: '0 auto', border: '1px solid #efefef' }} alt="Search Manage Templates" src="https://mintcdn.com/stackone-hub-mintlify-faq-auth-1778741451/K8GBYq-l4ZEZd4Dm/images/sapsuccessfactors/application-custom-field/sapsf_applicationcf_goto_job_req_and_goto_stage_13.png?fit=max&auto=format&n=K8GBYq-l4ZEZd4Dm&q=85&s=da44f89ace3942a9560bac0048bf7804" width="995" height="410" data-path="images/sapsuccessfactors/application-custom-field/sapsf_applicationcf_goto_job_req_and_goto_stage_13.png" />
    </Frame>

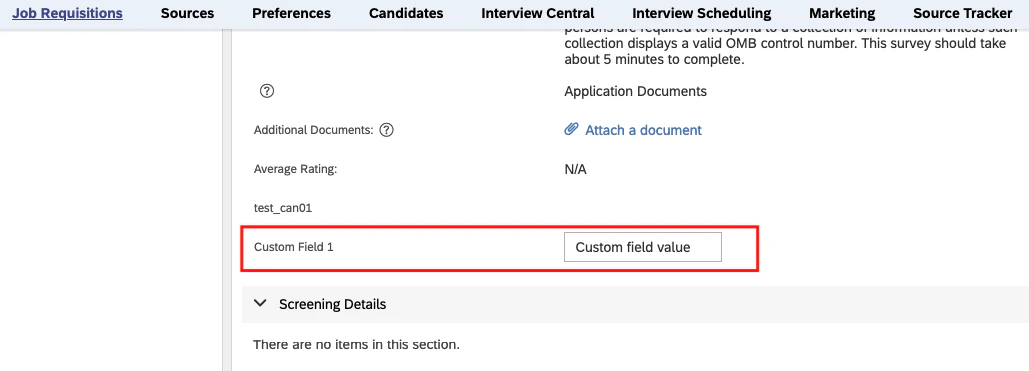
    The newly created custom fields will be visible in the job application

    <Accordion title="If fields are not visible after adding fields & permissions in above steps">
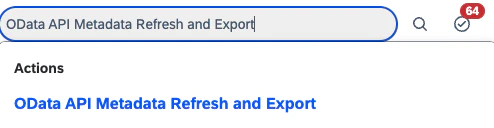
      Navigate to *Admin Center* and search for `OData API Metadata Refresh and Export`
      <Frame>
        <img className="rounded-md" style={{ margin: '0 auto', border: '1px solid #efefef' }} alt="OData API Metadata Refresh and Export" src="https://mintcdn.com/stackone-hub-mintlify-faq-auth-1778741451/K8GBYq-l4ZEZd4Dm/images/sapsuccessfactors/application-custom-field/sap_sf_bc_odata_api_search_38.png?fit=max&auto=format&n=K8GBYq-l4ZEZd4Dm&q=85&s=2e3aadb57edc2c85eae04264bb41c708" width="494" height="128" data-path="images/sapsuccessfactors/application-custom-field/sap_sf_bc_odata_api_search_38.png" />
      </Frame>

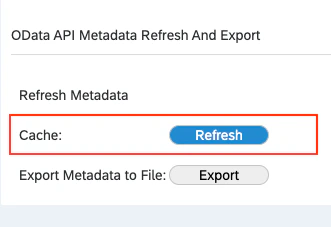
      Click on the `Refresh` button next to Cache.
      <Frame>
        <img className="rounded-md" style={{ margin: '0 auto', border: '1px solid #efefef' }} alt="Refresh button" src="https://mintcdn.com/stackone-hub-mintlify-faq-auth-1778741451/K8GBYq-l4ZEZd4Dm/images/sapsuccessfactors/application-custom-field/sap_sf_bc_odata_api_cache_refresh_39.png?fit=max&auto=format&n=K8GBYq-l4ZEZd4Dm&q=85&s=f5be9735c5a7ed53b2871742190ae45b" width="331" height="227" data-path="images/sapsuccessfactors/application-custom-field/sap_sf_bc_odata_api_cache_refresh_39.png" />
      </Frame>
    </Accordion>

    <Frame>
      <img className="rounded-md" style={{ margin: '0 auto', border: '1px solid #efefef' }} alt="Search Manage Templates" src="https://mintcdn.com/stackone-hub-mintlify-faq-auth-1778741451/K8GBYq-l4ZEZd4Dm/images/sapsuccessfactors/application-custom-field/sapsf_application_cf_added_cf_on_job_application_visible_14.png?fit=max&auto=format&n=K8GBYq-l4ZEZd4Dm&q=85&s=dc61c7db9e7f4af582b2c97212d26a07" width="1029" height="371" data-path="images/sapsuccessfactors/application-custom-field/sapsf_application_cf_added_cf_on_job_application_visible_14.png" />
    </Frame>

    <Note>
      To adjust the placement of custom fields, refer to <a href="#configure-application-custom-fields">step 3</a> in the "Configure Application Custom Fields" process.
    </Note>
  </Step>
</Steps>